
Mike Trethowan
Recently, I realized that I have not published a post on one of my personal loves, art. Well, the creation of art, that is. In particular, my obsession with a free software that I occasionally will spend a whole weekend engrossed with. That software is Blender.
On the Blender Foundation home page they proudly state; “Open Source 3D creation. Free to use for any purpose, forever.” This is neglect on my part for I have been using blender for several years as a hobbyist. I also have used blender to create a logo as a desktop image for a software that is in use at several institutions.
With Blender one can do real simple creations to extremely complex 3D animation. Blender allows one to work with different materials, lighting, cameras and camera angles. One can create a simple image, an animation, or export n animation as a series of stills that can be used to create animated GIFs, as an example. Blender has several background settings as well as transparency. Animations or images can be used as backgrounds. HDR images (High-dynamic-range imaging) can be used to create natural backgrounds that also provide environmental lighting. Surfaces, textures and coloring can be handled using the limited but faster internal Rendering Engine, or the much more refined external rendering engine that comes with Blender, Cycles Render engine and the accompanied Node Editor.
With Blender, one can’t go wrong… it’s free. The best thing are all of the Open Source support items such as Python Coded tools, Image Libraries and Video Tutorials published by many Blender users and professionals. To get a better idea of what blender can do, watch the fifteen minute animated movie “Sintel,” it’s about a girl and her search for her beloved baby dragon.
Below I present a small example of my work. No permission is extended to anyone to copy or download these images for their own use. Click on the image to view the larger higher resolution image.
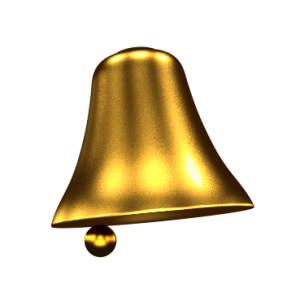
This simple bell is a low poly with two shaders, glossy and diffuse.The image also has a transparent background.
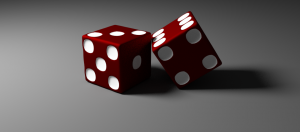 These Dice, like the bell are also one of the simplest image that one can create.
These are simply low poly squares with several shaders assigned to selected areas of the surface.
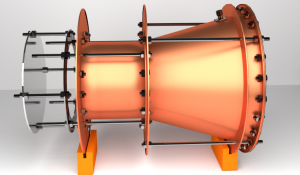
At the moment I can not recall if I used this in a post on NASA’s EmDrive experiments. This is much more complex, having several objects, though the surface treatment is simple. My interests include science and technology, so this is an obvious choice.

The Chess Set was a fun project. The chess board, like the Dice is a single object with several shaders assigned to the two different colored squares. The chess pieces are copies but also treated with different surfaces, one using a transparent shader and the other a glossy shader, both as to imitate glass work.
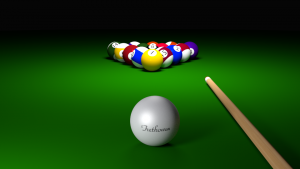
This scene is complex, though also simple because a lot of copying of a single item can be done. There are only five original items; the lighting, the table, the que, the solid balls and the striped balls. The balls were all duplicated and then textured. The numerals are done using the text feature and then wrapping that to the ball’s surface.
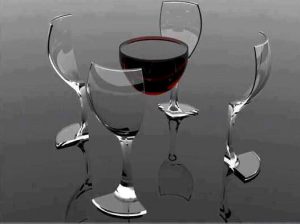
Originally I created a single goblet, but then decided to expand on the idea to show how depth, liquid, reflection and lighting are handled by Blender.
 As I mentioned in the introduction, an animated scene can be exported as discrete images. These were imported into Gimp as layers of individual PNG images and then exported as a GIF. On export Gimp asks how the animation is to be handled.
Click image to see the animation.
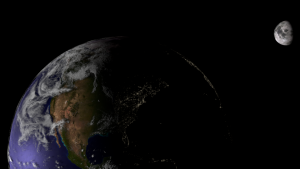 Spheres within spheres, literally… there are three spheres. To create a 3D earth requires several image maps and a sphere within a sphere using image maps from NASA.
Two spheres make up the earth. The first has four image maps, a daylight map, a night time map, a mask so that only the ocean, lakes and rivers have sun reflection. The fourth map is a “Bump Map.” This is a grey scale image where tighter tones are represented as taller than the darker tones. This gives mountains the appearance of height.
The second sphere is slightly larger than the first and contains only one map, a cloud map. Since the cloud map is essentially a grey scale image it also serves as a bump map giving the clouds varying height.
Also, as the second sphere is slightly larger than the globe sphere, the clouds cast a shadow on the surface of the globe adding depth to the image for that extra sense of realism.
The moon is to scale compared to the earth, however Blender doesn’t do distance all that well, so playing with distance is hit and miss. The moon is also based on a projection map from a NASA. To generate bump on the moon I simply made a copy of the original image and converted it to a negative image and applied it to a Bump Node.
Disclaimer:
This post is intended for informational and entertainment purposes only.
Blender, Sintel , Gimp and any other brand name mentioned in this post are the property of said corporations, to which I have no claim or affiliation.

Blender And Open Source 3D Creation.
Posted: 18th February 2017 by admin in 3D Anamation, 3D Rendering, Art, Blog, Commentary, Computer Art, Computers, General CommentsTags: 3D Anamation, 3D Art, 3D Rendering, Apple, Blender, Bump Map, Computer Art, Cycles Render, Gimp, Linux, Low Poly, Mac, Open Source, Programming, Python Script, Shader, Texture, Windows
Mike Trethowan
Recently, I realized that I have not published a post on one of my personal loves, art. Well, the creation of art, that is. In particular, my obsession with a free software that I occasionally will spend a whole weekend engrossed with. That software is Blender.
On the Blender Foundation home page they proudly state; “Open Source 3D creation. Free to use for any purpose, forever.” This is neglect on my part for I have been using blender for several years as a hobbyist. I also have used blender to create a logo as a desktop image for a software that is in use at several institutions.
With Blender one can do real simple creations to extremely complex 3D animation. Blender allows one to work with different materials, lighting, cameras and camera angles. One can create a simple image, an animation, or export n animation as a series of stills that can be used to create animated GIFs, as an example. Blender has several background settings as well as transparency. Animations or images can be used as backgrounds. HDR images (High-dynamic-range imaging) can be used to create natural backgrounds that also provide environmental lighting. Surfaces, textures and coloring can be handled using the limited but faster internal Rendering Engine, or the much more refined external rendering engine that comes with Blender, Cycles Render engine and the accompanied Node Editor.
With Blender, one can’t go wrong… it’s free. The best thing are all of the Open Source support items such as Python Coded tools, Image Libraries and Video Tutorials published by many Blender users and professionals. To get a better idea of what blender can do, watch the fifteen minute animated movie “Sintel,” it’s about a girl and her search for her beloved baby dragon.
Below I present a small example of my work. No permission is extended to anyone to copy or download these images for their own use. Click on the image to view the larger higher resolution image.
This simple bell is a low poly with two shaders, glossy and diffuse.The image also has a transparent background.
These are simply low poly squares with several shaders assigned to selected areas of the surface.
At the moment I can not recall if I used this in a post on NASA’s EmDrive experiments. This is much more complex, having several objects, though the surface treatment is simple. My interests include science and technology, so this is an obvious choice.
The Chess Set was a fun project. The chess board, like the Dice is a single object with several shaders assigned to the two different colored squares. The chess pieces are copies but also treated with different surfaces, one using a transparent shader and the other a glossy shader, both as to imitate glass work.
This scene is complex, though also simple because a lot of copying of a single item can be done. There are only five original items; the lighting, the table, the que, the solid balls and the striped balls. The balls were all duplicated and then textured. The numerals are done using the text feature and then wrapping that to the ball’s surface.
Originally I created a single goblet, but then decided to expand on the idea to show how depth, liquid, reflection and lighting are handled by Blender.
Click image to see the animation.
Two spheres make up the earth. The first has four image maps, a daylight map, a night time map, a mask so that only the ocean, lakes and rivers have sun reflection. The fourth map is a “Bump Map.” This is a grey scale image where tighter tones are represented as taller than the darker tones. This gives mountains the appearance of height.
The second sphere is slightly larger than the first and contains only one map, a cloud map. Since the cloud map is essentially a grey scale image it also serves as a bump map giving the clouds varying height.
Also, as the second sphere is slightly larger than the globe sphere, the clouds cast a shadow on the surface of the globe adding depth to the image for that extra sense of realism.
The moon is to scale compared to the earth, however Blender doesn’t do distance all that well, so playing with distance is hit and miss. The moon is also based on a projection map from a NASA. To generate bump on the moon I simply made a copy of the original image and converted it to a negative image and applied it to a Bump Node.
Disclaimer:
This post is intended for informational and entertainment purposes only.
Blender, Sintel , Gimp and any other brand name mentioned in this post are the property of said corporations, to which I have no claim or affiliation.